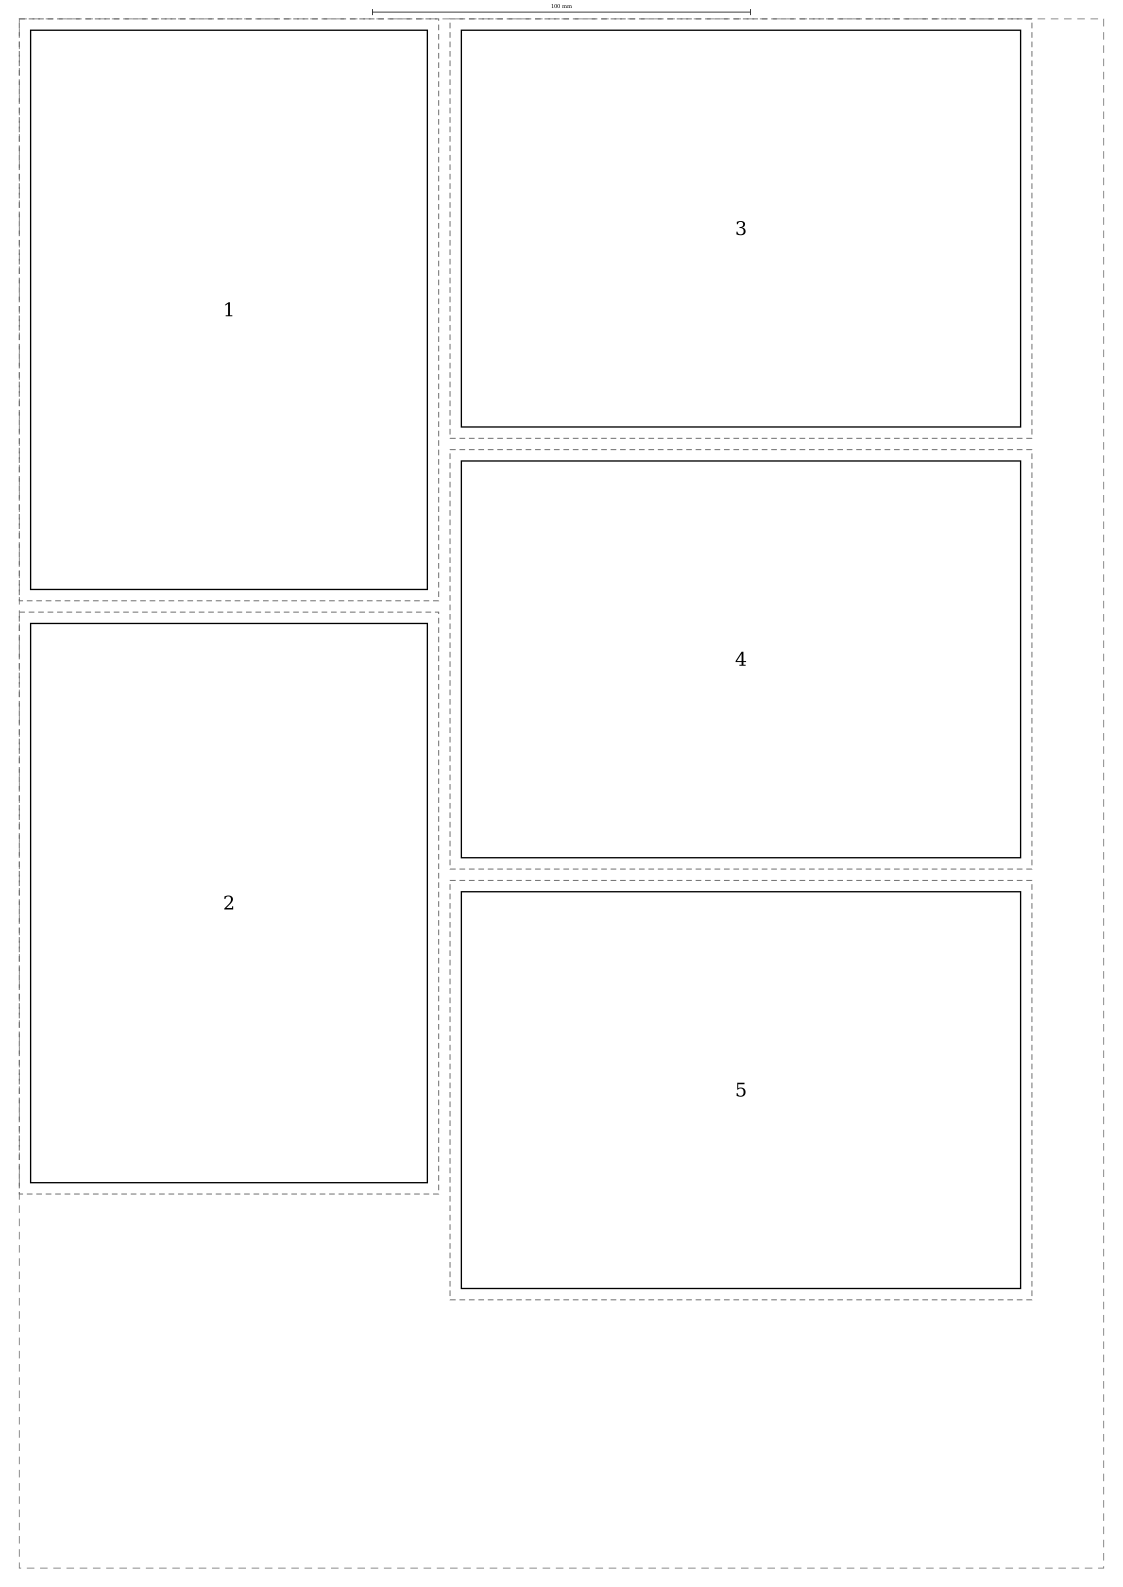
A worked comparison for 100 A6 pieces
These are two different layouts on a nominal 297 × 420 mm A3 sheet, using 105 × 148 mm A6 trim. The dimensions follow Adobe's A-series reference; ISO 216 identifies the trimmed A-series standard. The yields below are Paper & Scale's geometric calculations, not measured print-shop statistics.
| Scenario | Pieces per sheet | Sheets for 100 pieces |
|---|---|---|
| No bleed, no margin, no extra gap | 8 in the shown nominal grid | ceil(100 ÷ 8) = 13 |
| 3 mm bleed per edge, 5 mm sheet margins, 3 mm extra gaps | 5 in the constructed mixed layout | ceil(100 ÷ 5) = 20 |
The constructed count drops by (8 − 5) ÷ 8 × 100 = 37.5%, and this 100-piece job needs 7 extra sheets, before spoilage or test prints. The five-piece layout is feasible; it is not a proof of the globally best packing. The comparison describes these exact assumptions, not a typical production loss. Adobe explains why bleed extends outside the finished trim; 3 mm is the chosen allowance here, so use your printer's requirement.
The familiar answer is eight
An A3 sheet is 297 × 420 mm; an A6 piece is 105 × 148 mm. Turn each A6 piece sideways and arrange two across and four down: 2 × 148 = 296 mm, and 4 × 105 = 420 mm. That leaves just 1 mm across the sheet and nothing along its height.
This is a geometric arrangement, not a promise that a printer can reproduce artwork to every edge. It assumes no bleed, gutter or reserved printer margin. Open the eight-piece nominal plan to see those exact assumptions.
Allowances change the pieces that must fit
A 3 mm bleed around a finished A6 piece gives a footprint of 111 × 154 mm: 105 + 6 by 148 + 6. Reserving 5 mm at every sheet edge leaves 287 × 410 mm. Our 3 mm gutter is additional space between those bleed footprints, as explained in the print-region guide.
| Arrangement | Constructed count | Layout reasoning |
|---|---|---|
| All pieces as entered | 4 | Two columns × two rows |
| All pieces rotated | 3 | One column × three rows |
| Mixed two-column plan | 5 | Two as entered beside three rotated |
The mixed plan uses a 111 mm column, a 3 mm gutter and a 154 mm column: 268 mm in total. The columns occupy 311 mm and 339 mm of height respectively, including their internal gaps. Both stay within the usable sheet.

Use the plan for the job you actually have
The planner compares uniform, mixed two-zone and pinwheel candidates. Five is the count constructed above; this example does not claim to prove the global optimum across every possible packing. Rotation may also be unsuitable when paper grain, folding or the artwork imposes an orientation.
For 100 finished pieces, a five-up arrangement needs 20 sheets before spoilage or test prints. Keep the artwork at 100%, account separately for crop marks or press requirements, and measure a sample. If the next decision is a smaller parent sheet, compare A6 on A4. For folded work, check A5 dimensions rather than treating this cutting layout as booklet imposition.
Sources and calculation method
- ISO 216:2007 identifies the trimmed A-series standard. Adobe's published A-series table supplies the nominal millimetre dimensions used here.
- Adobe: set a print bleed explains artwork extending beyond the finished trim. The 3 mm bleed in our examples is a chosen allowance; use your printer's requirement.
Placements, comparisons and proofs are Paper & Scale's calculations from those dimensions. They assume axis-aligned rectangular pieces at 100% scale, optional 90-degree rotation, separate bleed footprints and the stated spacing. They do not certify a production job.